Running tests in parallel with JUnit 5

Before JUnit 5 running tests in parallel was not easy. JUnit 4 had no built-in mechanism to do this, so we were dependent on the runner we used like Maven or Gradle. Maven has pretty configurable options for running Junit 4 tests in parallel. At the same time, from what I've read, Gradle's runner is much more limited in that sense. Of course, you could always write your parallel runner. That is most often what I ended up doing.
Luckily, now we have JUnit 5, and it has the possibility of running tests in parallel out of the box.
Running tests in parallel
The JUnit team has the feature to run tests in parallel still marked as experimental, so it is not on by default. To turn the option on you need to put:
junit.jupiter.execution.parallel.enabled = truein the src/test/resources/junit-platform.properties file. After adding this, the option to run tests in parallel is turned on. However, since JUnit 5 runs both classes and methods in a single thread by default, this won't change a thing.
The parallel execution is controlled using the Execution annotation. It can take two values, ExecutionMode.CONCURRENT or ExecutionMode.SAME_THREAD, with the latter being the default, implicit value. Using this annotation we can control parallelism on a method or class level. We can say that one or more methods in a class will run in parallel, one or more classes will run in parallel, or both. Let us look at a few example that will hopefully make this clearer.
Example
Let us suppose that we have three different test classes, C1, C2 and C3, each with two test methods, M1 and M2, for a total of 6 tests.
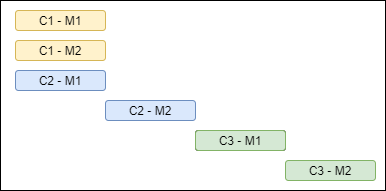
In the first example, only C1 is annotated to be run in parallel. However, the first method of C2 (which is not annotated) runs in parallel with the methods of C1 as well. It is up to you to make sure that the methods of C1 can be run in parallel without having any side effects to any other test methods. We get the same effect if we annotate C2 in addition to C1.
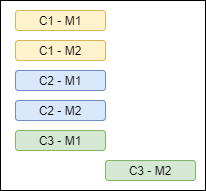
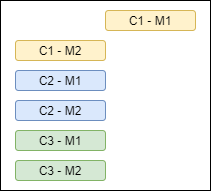
The annotation can be used on test methods as well. If we only annotate M1 of C1, we get the following execution flow:
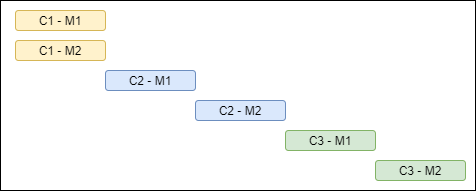
Opposite to what we might expect, when we in addition to C1-M1 annotate C2-M2 as well, these two tests wont run in parallel to each other. Adding the annotation only on the method but not on the class means that the method will run in parallel with other methods in the same parent class. But, if the parent class doesn't have the annotation at the same time, that class wont run in parallel to other classes.
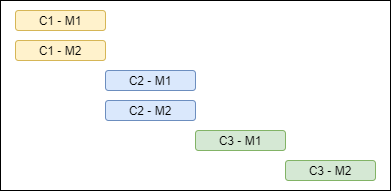
From the diagrams you can notice that when you have only two methods, it doesn't matter if you place the annotation on the class, on one or two of the methods in the test class. The effect will be the same.
Bare in mind that JUnit5, by default, does not guarantee the exact order of execution of test cases. The examples are here to illustrate the level of parallelism, not the exact order the tests are going to be run in.
Changing the defaults
If we have many test cases that we want to run in parallel it would be too much work to annotate each class. What we can do instead is change the global defaults. This is where we utilise the junit-platform.properties file again. We can change the defaults for class and method execution:
junit.jupiter.execution.parallel.mode.default
junit.jupiter.execution.parallel.mode.classes.default
Same as with the annotation, the values of these properties can be:
- same_thread - for single threaded execution
- concurrent - for parallel execution
When junit.jupiter.execution.parallel.mode.classes.default is not set, it will use the value of junit.jupiter.execution.parallel.mode.default.
junit.jupiter.execution.parallel.enabled = true
junit.jupiter.execution.parallel.mode.default = concurrentSynchronization
My probably most favourite feature of JUnit 5 related to parallel test execution is the possibility to synchronise tests. For this purpose we use the ResourceLock annotation.
    @Test
    @DisplayName("C1 M1")
    @ResourceLock(value = Resources.SYSTEM_PROPERTIES, mode = ResourceAccessMode.READ_WRITE)
    void testOne() {

    }
You can use any string as value or use one of the built in values in the Resources class. The ResourceLock annotation also takes an additional mode parameter of enum type ResourceAccessMode. It has two options, READ_WRITE and READ. This allows an even finer grained synchronisation. Two tests in READ mode can run in parallel but not in parallel with tests that have the READ_WRITE mode.
Conclusion
Although still marked as an experimental feature, the option to run tests in parallel is a well thought out and welcomed addition to JUnit 5.
Links
- Example code: https://github.com/igorstojanovski/junit5-examples
- Cover photo by Paulius Dragunas on Unsplash
Member discussion